3.17 用Nginx部署Go應用
專案地址:https://github.com/EDDYCJY/go-gin-example
知識點
- Nginx。
- 反向代理。
本文目標
簡單部署後端服務。
做什麼
在本章節,我們將簡單介紹 Nginx 以及使用 Nginx 來完成對 go-gin-example 的部署,會實作反向代理和簡單負載均衡的功能。
Nginx
是什麼
Nginx 是一個 Web Server,可以用作反向代理、負載均衡、郵件代理、TCP / UDP、HTTP 伺服器等等,它擁有很多吸引人的特性,例如:
- 以較低的記憶體佔用率處理 10,000 多個併發連線(每10k非活動HTTP保持活動連線約2.5 MB )
- 靜態伺服器(處理靜態檔案)
- 正向、反向代理
- 負載均衡
- 透過OpenSSL 對 TLS / SSL 與 SNI 和 OCSP 支援
- FastCGI、SCGI、uWSGI 的支援
- WebSockets、HTTP/1.1 的支援
- Nginx + Lua
安裝
請右拐谷歌或百度,安裝好 Nginx 以備接下來的使用
簡單講解
常用命令
- nginx:啟動 Nginx
- nginx -s stop:立刻停止 Nginx 服務
- nginx -s reload:重新載入設定檔案
- nginx -s quit:平滑停止 Nginx 服務
- nginx -t:測試設定檔案是否正確
- nginx -v:顯示 Nginx 版本資訊
- nginx -V:顯示 Nginx 版本資訊、編譯器和設定引數的資訊
涉及設定
1、 proxy_pass:設定反向代理的路徑。需要注意的是如果 proxy_pass 的 url 最後為 /,則表示絕對路徑。否則(不含變數下)表示相對路徑,所有的路徑都會被代理過去
2、 upstream:設定負載均衡,upstream 預設是以輪詢的方式進行負載,另外還支援四種模式,分別是:
(1)weight:權重,指定輪詢的機率,weight 與訪問機率成正比
(2)ip_hash:按照訪問 IP 的 hash 結果值分配
(3)fair:按後端伺服器響應時間進行分配,響應時間越短優先級別越高
(4)url_hash:按照訪問 URL 的 hash 結果值分配
部署
在這裡需要對 nginx.conf 進行設定,如果你不知道對應的設定檔案是哪個,可執行 nginx -t 看一下
$ nginx -t
nginx: the configuration file /usr/local/etc/nginx/nginx.conf syntax is ok
nginx: configuration file /usr/local/etc/nginx/nginx.conf test is successful
顯然,我的設定檔案在 /usr/local/etc/nginx/ 目錄下,並且測試透過
反向代理
反向代理是指以代理伺服器來接受網路上的連線請求,然後將請求轉發給內部網路上的伺服器,並將從伺服器上得到的結果返回給請求連線的客戶端,此時代理伺服器對外就表現為一個反向代理伺服器。(來自百科)
設定 hosts
由於需要用本機作為演示,因此先把對映配上去,開啟 /etc/hosts,增加內容:
127.0.0.1 api.blog.com
設定 nginx.conf
開啟 nginx 的設定檔案 nginx.conf(我的是 /usr/local/etc/nginx/nginx.conf),我們做了如下事情:
增加 server 片段的內容,設定 server_name 為 api.blog.com 並且監聽 8081 埠,將所有路徑轉發到 http://127.0.0.1:8000/ 下
worker_processes  1;

events {
    worker_connections  1024;
}


http {
    include       mime.types;
    default_type  application/octet-stream;

    sendfile        on;
    keepalive_timeout  65;

    server {
        listen       8081;
        server_name  api.blog.com;

        location / {
            proxy_pass http://127.0.0.1:8000/;
        }
    }
}
驗證
啟動 go-gin-example
回到 go-gin-example 的專案下,執行 make,再執行 ./go-gin-exmaple
$ make
github.com/EDDYCJY/go-gin-example
$ ls
LICENSE        README.md      conf           go-gin-example middleware     pkg            runtime        vendor
Makefile       README_ZH.md   docs           main.go        models         routers        service
$ ./go-gin-example
...
[GIN-debug] DELETE /api/v1/articles/:id      --> github.com/EDDYCJY/go-gin-example/routers/api/v1.DeleteArticle (4 handlers)
[GIN-debug] POST   /api/v1/articles/poster/generate --> github.com/EDDYCJY/go-gin-example/routers/api/v1.GenerateArticlePoster (4 handlers)
Actual pid is 14672
重啟 nginx
$ nginx -t
nginx: the configuration file /usr/local/etc/nginx/nginx.conf syntax is ok
nginx: configuration file /usr/local/etc/nginx/nginx.conf test is successful
$ nginx -s reload
訪問介面
如此,就實作了一個簡單的反向代理了,是不是很簡單呢
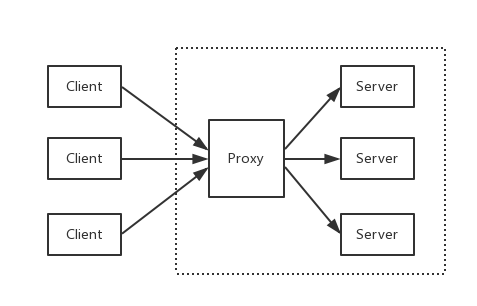
負載均衡
負載均衡,英文名稱為Load Balance(常稱 LB),其意思就是分攤到多個操作單元上進行執行(來自百科)
你能從運維口中經常聽見,XXX 負載怎麼突然那麼高。 那麼它到底是什麼呢?
其背後一般有多臺 server,系統會根據設定的策略(例如 Nginx 有提供四種選擇)來進行動態調整,儘可能的達到各節點均衡,從而提高系統整體的吞吐量和快速響應
如何演示
前提條件為多個後端服務,那麼勢必需要多個 go-gin-example,為了演示我們可以啟動多個埠,達到模擬的效果
為了便於演示,分別在啟動前將 conf/app.ini 的應用埠修改為 8001 和 8002(也可以做成傳入引數的模式),達到啟動 2 個監聽 8001 和 8002 的後端服務
設定 nginx.conf
回到 nginx.conf 的老地方,增加負載均衡所需的設定。新增 upstream 節點,設定其對應的 2 個後端服務,最後修改了 proxy_pass 指向(格式為 http:// + upstream 的節點名稱)
worker_processes  1;

events {
    worker_connections  1024;
}


http {
    include       mime.types;
    default_type  application/octet-stream;

    sendfile        on;
    keepalive_timeout  65;

    upstream api.blog.com {
        server 127.0.0.1:8001;
        server 127.0.0.1:8002;
    }

    server {
        listen       8081;
        server_name  api.blog.com;

        location / {
            proxy_pass http://api.blog.com/;
        }
    }
}
重啟 nginx
$ nginx -t
nginx: the configuration file /usr/local/etc/nginx/nginx.conf syntax is ok
nginx: configuration file /usr/local/etc/nginx/nginx.conf test is successful
$ nginx -s reload
驗證
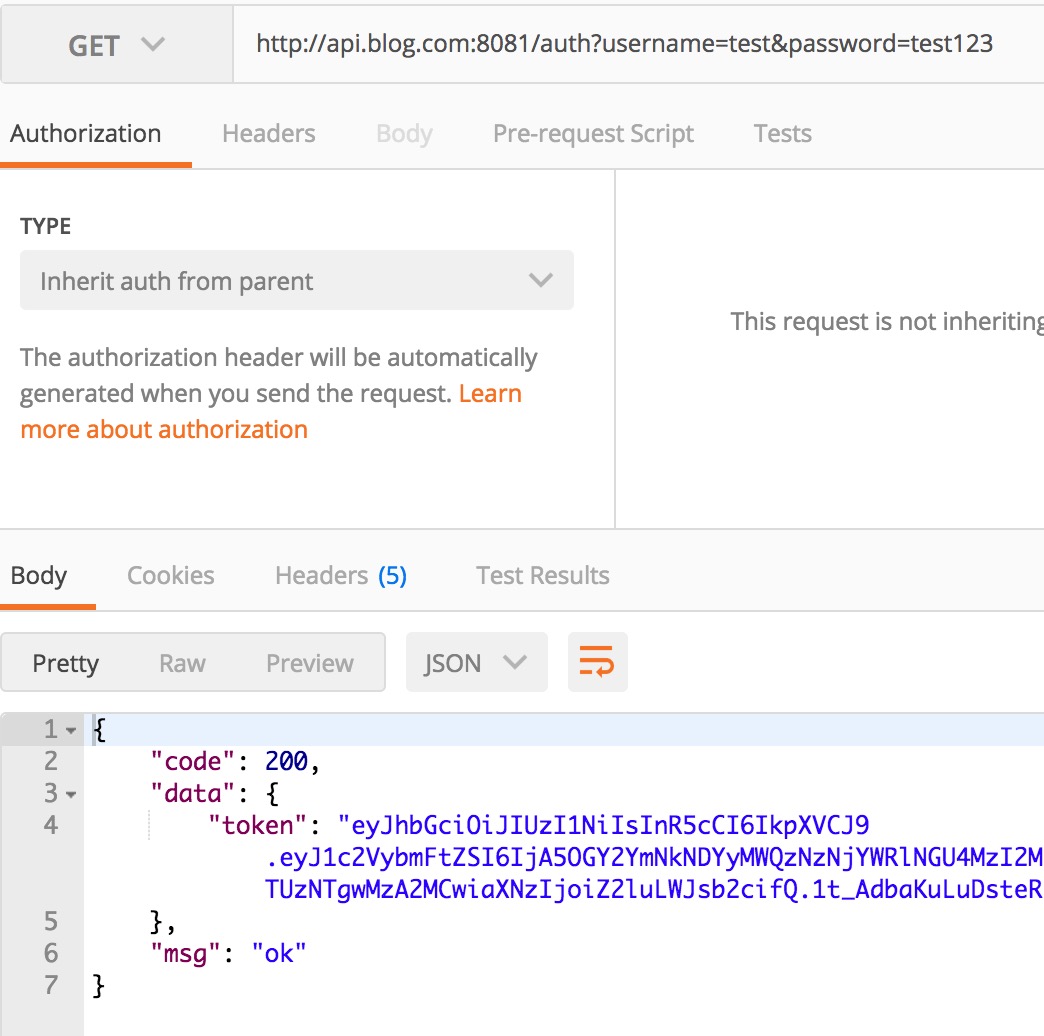
再重複訪問 http://api.blog.com:8081/auth?username={USER_NAME}}&password={PASSWORD},多訪問幾次便於檢視效果
目前 Nginx 沒有進行特殊設定,那麼它是輪詢策略,而 go-gin-example 預設開著 debug 模式,看看請求 log 就明白了


總結
在本章節,希望您能夠簡單習得日常使用的 Web Server 背後都是一些什麼邏輯,Nginx 是什麼?反向代理?負載均衡?
怎麼簡單部署,知道了吧。
參考
本系列示例程式碼
關於
修改記錄
- 第一版:2018年02月16日釋出文章
- 第二版:2019年10月01日修改文章
?
如果有任何疑問或錯誤,歡迎在 issues 進行提問或給予修正意見,如果喜歡或對你有所幫助,歡迎 Star,對作者是一種鼓勵和推進。
我的微信公眾號