現在我們把例 12.1 “用堆棧實現倒序打印”拆成兩個程序檔案,stack.c實現堆棧,而main.c使用堆棧:
/* stack.c */
char stack[512];
int top = -1;

void push(char c)
{
	stack[++top] = c;
}

char pop(void)
{
	return stack[top--];
}

int is_empty(void)
{
	return top == -1;
}這段程序和原來有點不同,在例 12.1 “用堆棧實現倒序打印”中top總是指向棧頂元素的下一個元素,而在這段程序中top總是指向棧頂元素,所以要初始化成-1才表示空堆棧,這兩種堆棧使用習慣都很常見。
/* main.c */
#include <stdio.h>

int a, b = 1;

int main(void)
{
	push('a');
	push('b');
	push('c');

	while(!is_empty())
		putchar(pop());
	putchar('\n');

	return 0;
}a和b這兩個變數沒有用,只是為了順便說明連結過程才加上的。編譯的步驟和以前一樣,可以一步編譯:
$ gcc main.c stack.c -o main
也分可以多步編譯:
$ gcc -c main.c
$ gcc -c stack.c
$ gcc main.o stack.o -o main
如果按照第 2 節 “main函數和啟動常式”的做法,用nm命令查看目標檔案的符號表,會發現main.o中有未定義的符號push、pop、is_empty、putchar,前三個符號在stack.o中實現了,連結生成執行檔main時可以做符號解析,而putchar是libc的庫函數,在執行檔main中仍然是未定義的,要在程序運行時做動態連結。
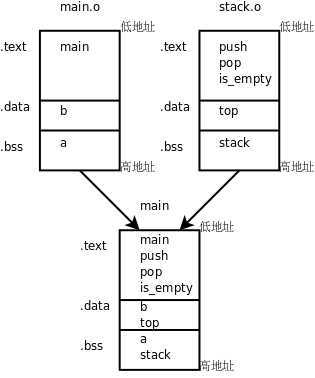
我們通過readelf -a main命令可以看到,main的.bss段合併了main.o和stack.o的.bss段,其中包含了變數a和stack,main的.data段也合併了main.o和stack.o的.data段,其中包含了變數b和top,main的.text段合併了main.o和stack.o的.text段,包含了各函數的定義。如下圖所示。
為什麼在執行檔main的每個段中來自main.o的變數或函數都在前面,而來自stack.o的變數或函數都在後面呢?我們可以試試把gcc命令中的兩個目標檔案反過來寫:
$ gcc stack.o main.o -o main
結果正如我們所預料的,執行檔main的每個段中來自main.o的變數或函數都排到後面了。實際上連結的過程是由一個連結腳本(Linker Script)控制的,連結腳本決定了給每個段分配什麼地址,如何對齊,哪個段在前,哪個段在後,哪些段合併到同一個Segment,另外連結腳本還要插入一些符號到最終生成的檔案中,例如__bss_start、_edata、_end等。如果用ld做連結時沒有用-T選項指定連結腳本,則使用ld的預設連結腳本,預設連結腳本可以用ld --verbose命令查看(由於比較長,只列出一些片斷):
$ ld --verbose
...
using internal linker script:
==================================================
/* Script for -z combreloc: combine and sort reloc sections */
OUTPUT_FORMAT("elf32-i386", "elf32-i386",
	      "elf32-i386")
OUTPUT_ARCH(i386)
ENTRY(_start)
...
SECTIONS
{
  /* Read-only sections, merged into text segment: */
  PROVIDE (__executable_start = 0x08048000); . = 0x08048000 + SIZEOF_HEADERS;
  .interp         : { *(.interp) }
  .note.gnu.build-id : { *(.note.gnu.build-id) }
  .hash           : { *(.hash) }
  .gnu.hash       : { *(.gnu.hash) }
  .dynsym         : { *(.dynsym) }
  .dynstr         : { *(.dynstr) }
  .gnu.version    : { *(.gnu.version) }
  .gnu.version_d  : { *(.gnu.version_d) }
  .gnu.version_r  : { *(.gnu.version_r) }
  .rel.dyn        :
...
  .rel.plt        : { *(.rel.plt) }
...
  .init           :
...
  .plt            : { *(.plt) }
  .text           :
...
  .fini           :
...
  .rodata         : { *(.rodata .rodata.* .gnu.linkonce.r.*) }
...
  .eh_frame       : ONLY_IF_RO { KEEP (*(.eh_frame)) }
...
  /* Adjust the address for the data segment.  We want to adjust up to
     the same address within the page on the next page up.  */
  . = ALIGN (CONSTANT (MAXPAGESIZE)) - ((CONSTANT (MAXPAGESIZE) - .) & (CONSTANT (MAXPAGESIZE) - 1)); . = DATA_SEGMENT_ALIGN (CONSTANT (MAXPAGESIZE), CONSTANT (COMMONPAGESIZE));
...
  .ctors          :
...
  .dtors          :
...
  .jcr            : { KEEP (*(.jcr)) }
...
  .dynamic        : { *(.dynamic) }
  .got            : { *(.got) }
...
  .got.plt        : { *(.got.plt) }
  .data           :
...
  _edata = .; PROVIDE (edata = .);
  __bss_start = .;
  .bss            :
...
  _end = .; PROVIDE (end = .);
  . = DATA_SEGMENT_END (.);
  /* Stabs debugging sections.  */
...
  /* DWARF debug sections.
     Symbols in the DWARF debugging sections are relative to the beginning
     of the section so we begin them at 0.  */
...
}


==================================================ENTRY(_start)說明_start是整個程序的入口點,因此_start是入口點並不是規定死的,是可以改用其它函數做入口點的。
PROVIDE (__executable_start = 0x08048000); . = 0x08048000 + SIZEOF_HEADERS;是Text Segment的起始地址,這個Segment包含後面列出的那些段,.plt、.text、.rodata等等。每個段的描述格式都是“段名 : { 組成 }”,例如.plt : { *(.plt) },左邊表示最終生成的檔案的.plt段,右邊表示所有目標檔案的.plt段,意思是最終生成的檔案的.plt段由各目標檔案的.plt段組成。
. = ALIGN (CONSTANT (MAXPAGESIZE)) - ((CONSTANT (MAXPAGESIZE) - .) & (CONSTANT (MAXPAGESIZE) - 1)); . = DATA_SEGMENT_ALIGN (CONSTANT (MAXPAGESIZE), CONSTANT (COMMONPAGESIZE));是Data Segment的起始地址,要做一系列的對齊操作,這個Segment包含後面列出的那些段,.got、.data、.bss等等。
Data Segment的後面還有其它一些Segment,主要是調試信息。關於連結腳本就介紹這麼多,本書不做深入討論。
